
The word “bonsai” plainly means “in a pot”, or, “tray planting”. On the other hand, bonsai is a lot more than just a potted plant. Producing the look of large size and age is the objective of bonsai. This is achieved by making a bonsai with firm roots that go in all different ways, forming a feeling of stability, a large trunk which narrows as it extends higher, a clear summit, and shapely, orderly branches. These characteristics unite to make a thorough mix of evenness, quantity and poise. Additionally, the bonsai needs to be planted into a pot that goes well with the plant itself.
Planting Your Bonsai
Bonsai trees are meant to grow within a container so in order to correctly foster the growth of your tree you will need to select an appropriate container. The bonsai is completely independent of the earth since the tree’s roots are planted within the soil of its container. The bonsai is considered a separate entity that is complete in itself yet is part of nature. This dichotemy is best explained in the expression “heaven and earth in one container”.

A bonsai tree should always have the visual effect of being asymmetrical, being off-center in its container, the center point should also be unoccupied to signify symbolically where heaven and earth meet.
The triangular pattern of the bonsai tree is a necessary aesthetic principle, expressing a relationship shared between a universal principle of life-giving energy or deity, the artist, and the bonsai tree. To create a traditional bonsai it is necessary to hold to the three basic virtues of truth, goodness, and beauty. The three basic virtues form the triangle that together represent the bonsai. The initial containers differ from the traditional containers used for later bonsai development due to the fact that the roots must be pruned for a bonsai. These containers that are used first are called training pots.
In the beginning before the roots are pruned to be small and fiberous, it is a good idea to choose a similar pot to what you would use for your finished bonsai design, but anything will do initially to hold the heavy roots.
Deep pots should be used to train cascading plants, while tall plants will need to start off in fairly shallow containers if they will end up in shallow pots. The drain holes for all training pots need to be at least one half inch in diameter. The traditional bonsai pots are available in various shapes such as round, oval, square, rectangular, and hexagonal; these can be found at large nurseries and import stores. For round or rectangular shaped pots bonsai in cascade and semi-cascade styles look best.
The plant should be in the center of the pot with its branches sweeping over the sides of the pot. For rectangular or oval pots, upright trees look best; they should be place about one third from the edge’s distance off center. Even though it doesn’t need to always be obeyed, the pot for your bonsai needs to complement the tree and not be very big, in fact the pot’s depth should equal the plant’s trunk width.
If the attention should be kept on the planting itself, you should select a wide and shallow pot. This wide and flat bonsai pot will give the feeling found in the deep forest, a feeling of calm serenity. When choosing a container the length should be about two-thirds the height of the tree.
For the pot size of a bonsai tree that is wider than it is tall use the width of the plant to correctly gauge it. You will need to find a planter that has a width two-third the height of the bonsai tree with a depth that is approximately 1 1/2 times the tree’s trunk diameter. The color for you bonsai pot should complement the type of tree such as a brightly colored pot for flowering trees or a deciduous tree with stunning fall leaves or more subdue colors for a pine of cedar tree. It is also a good idea to look at the bark of your bonsai tree. If the bark has a rough texture, a pot with a bit of texture would work very well.
Keep in mind that no pot for your tree is permanent. To keep your bonsai tree from becoming root bound you will need to repot it over time. To give the impression of a full sized tree in nature you may add moss and other small plants around your bonsai tree once it has been potted.
Repotting Your Bonsai
You will generally need to prune and repot your bonsai tree every few years. Bonsais need to be repotted to prevent them from becoming root-bound and to facilitate the development of new feeder roots which will allow for more efficient moisture absorption for the tree. You should also switch out the old soil for new soil because it is most likely stale and will only hinder the plant’s growth.
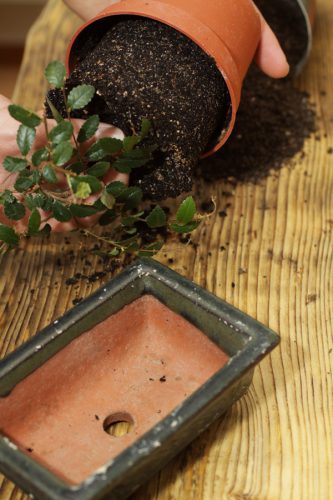
You can easily determine if it is time for a bigger pot, if you notice the roots are crowding in the sides or the water is taking much longer to drain. To begin, you will need to carefully and gently lift the tree freeing it from its current pot–tilt the pot to one side and move the plant by the trunk’s base. Do not tug hard on the trunk, if the plant does not free itself immediately, you might want to tap the side of pot with your hand in an effort to loosen the plant’s root ball, another method is to push something up through the drainage openings and slowly push the plant out.
Once the plant is free from the pot slowly separate any accent plants and moss (you can use a knitting needle, chopstick, metal hook or something similar) you will then want to untangle the roots and gentle brush out the old soil. You should always start at the ends and work around the plant. Do not tug or pull at the roots, you really want to comb because if you are not careful you could tear or damage an important root.
Keep brushing off and shaking off excess soil (until the ball is about a third or a half of its original size).
At this point, it is a very smart idea to spray down the roots with water, because you do not want them drying out and you do really want them to be as clean as possible when you start to prune them. You should always use the sharpest possible cutters to prune the plants roots. You can find pruning scissors created just for bonsai root trimming on the market, but you can just use your normal set of bonsai clippers.
The biggest reason why you want to get rid of as much soil as possible is because the soil will dull the blades, the less soil on the roots, the sharper your blades will stay throughout the process.
You should begin by cutting away the thicker, older brown roots which tend to congregate towards the outer edge around the pot’s edge, and these roots can stop or restrict the development of younger feeder roots. You should prune away about a third and up to a half of these roots but you will need to be careful that you do not accidentally cut away too many feeder roots.
Now, turn your attention to the thin roots that hang down into the pot and trim them to better suit the new pot’s shape. The roots should be shaped to fit easily into the new pot with about a 1 to 2 cm (.5 to .75 inch) gap between them and the edge.
You have now completed the most demanding aspect of repotting (if you think you have accidentally cut too many feeder roots, do not panic as they will regrow from where they were cut).
You can now either cleanse the pot it was originally in or find a new pot that is better suited for the tree–be sure to place a wire mesh to cover drainage holes so the soil does not leak out. When you place the plant into the new pot, please be aware that it is now quite unstable and you will have to add some anchors to keep your tree from tipping over.
Just run some wire up into the holes or through the anchoring holes and leave them until you need to secure them. You do not need wire that is particularly thick. Put a thin layer of gravel over the wire mess (this will help drainage) and then add the soil. Figure out how the plant needs to be best situated (most of the time it needs to be off-center and towards the rear of the pot) then create a small mound of soil for the plant to perch on. Next, place the bonsai on its prepared mound and gently nestle it in and spread out hte roots so they are even over the soil.
If you are content with the position and height of the plant (keep in mind it will be set there for at least a year), you will then need to take the wires you had fixed earlier and twist them together with a pair of pliers above the main root ball–make sure it is being held securely and will not tip. You can remove the unsightly wires after a few months or whenever the tree has settled into the new pot and is stable.
You will now want to add enough soil to reach the bottom of the trunk or just below the lip of the pot. Tap the pot’s sides with your hand and confirm that its soil is settled and you cannot see any gaps where the roots are. Take a chopstick (or like device) and ensure that the roots look correct in the soil and are place in the correct manner.
With the soil in place you can add the other features to your bonsai like: rocks, accent paths, moss, or gravel (or any other plant or decoration to better enhance your vision). If you are replanting moss you will need to get rid of the old soil by cutting it off prior to you planting it and try not to plant a moss plant that is too big for your tree.
It is now time to give your tree a thorough watering (the water may cause the soil level to drop further and you may need to add more). now put your tree in a place where it is in moderate temperatures and not in direct sun, it will need to recuperate. You should not add fertilizer as it can stress the plant out or burn it. In a month, you can give it some fertilizer to the plant as the roots have most likely recovered from the ordeal by then.
You will also need to prune the branches to balance the pruning you have just done on the roots–it will not place the plant at a further disadvantage and the plant should recover in a timely fashion. Branches and roots usually grow at the same rate.